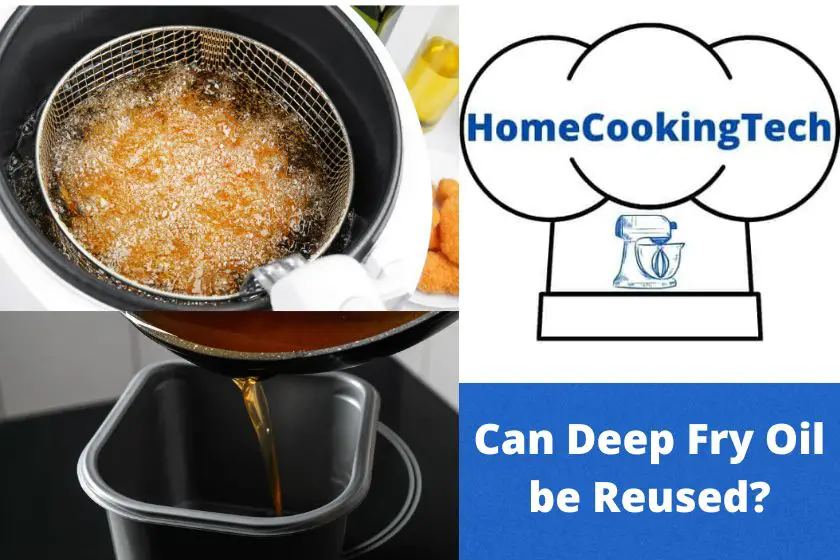
Deep fry oil can be reused. Not only within the same day, but you can also filter it and store it up for later use.
If this is enough for you, I am happy, and I will see you next time.
If you are interested in how and what to look for, then join me in this oil reusing journey as we take a closer look at the question.
Type of oil suitable for reuse
As the title suggests picking the correct oil is quite an important part. The reason for this is ‘smoke point’ (more on that later) of every oil is different.
For example, a melted butter has a smoke point of 302°F (150°C). Now that is quite low for deep frying, as you should be aiming for 375°F (190°C).
Of course, there are tricks to improve this, like making clarified butter (ghee), which raises the smoke point to 482°F (250°C). I am assuming that you don’t have access to this, as it takes time and space to store amounts that would accommodate deep frying.
On the other hand, vegetable oil has around 428°F (220°C), which is more than suitable for deep frying, right out of the bottle.
So what to take out of this? Always check the smoke point of your chosen oil, so you are sure that it can handle a deep-frying minimum or the temperature you would like to have.
The smoke point of an oil
As mentioned above and also in my article about the best oil for deep frying chicken, the highest temperature of the oil is one of the most important things.
Why is that?
Well, at and beyond it, the oils start to break down. You would notice visible smoke rising from the deep fryer and smelled burning, as your oil reaches its smoke point. The possibility of reaching the burning point, as it is sometimes called, scares most people and prevents them from deep-frying at home. It is nothing to be afraid of, but at the same time, it is essential to keep this possibility in mind and prevent it from happening.
If you reach 375°F (190°C) and your oil starts smoking, you should immediately lower the temperature, so your oil does not overheat and starts to burn.
The most common mistake is using the wrong type of oil. A couple of years back, I would not have thought about it, but recently a bit of mischief happened to a friend of mine named Thomas.
Long story short, his kids were playing in the kitchen and combined unrefined peanut oil (smoke point 320°F (160°C)) and vegetable oil. Boom! The lower smoke point spread the burnt smell throughout the house. Of course, he didn’t follow my advice of immediately turning the heat off, as he thought it is just a ‘state’ that will pass.
Most straightforward rule to follow, when smoke appears is:
Turn the heat off!
But I am getting distracted with essential warnings, back to business.
How to reuse the deep fry oil?
Now I will assume that everything is dandy. You just finished the deep-frying of your favorite meal, and you know that you have not crossed the smoke point.
What now?
Step #1 Wait for oil to cool down
The time for this to happen will depend on your environment, but about an hour should be a safe bet. Dealing with hot oil can bring a whole lot of additional problems.
In the best scenario, it will just meltdown the storing container. You know, super hot oil and room temperature plastic don’t go well together.
So take it easy, turn off the heat and eat the food. Enjoy time with family, friends, or TV :-D.
Step #2 Two boxes method
Get yourself a container in which you will keep your filtered oil and a second one to act as a transfer box. Yes, you have to filter it out before storing it for later use. The reasoning behind this is the fact that most deep-fried foods leave crumbs, breading, and other bits behind, which have a form of charcoal in most cases.
Using two boxes is a great way to make the whole operation easier on yourself because you will want to make sure that oil is as clean as possible. We are gonna pour oil from one container to another through a homemade sieve and handling the whole deep fryer can get draining fast.
As you don’t look for the burnt taste in your next usage of the oil, you have to get rid of them.
Step #3 Filtering the mess out
Grab a metal strainer – the more delicate, the better, and some cheesecloth. If you don’t have any on your hand, you can get them beforehand in your local store.
Alternatively, you can also use a handkerchief. Even a paper towel will do you justice, but you should keep in mind that it will soak up a bit of oil, so you will have to ‘bag’ the towel afterward and squeeze it as hard as you can to get the residual oil out.
Step #4 Final prep to oil filtration
I found out that it is best to place an open container into the sink, put a metal strainer over and lay it out with cheesecloth or something similar to complete your homemade filter. This way, you have a double-layer superfine sieve that will help you to get rid of all unnecessary breadcrumbs and bits.
Step #5 Pour the oil in the box
Take your deep fryer full of oil, it should be cool now, and slowly pour its contents to the container through cheesecloth and metal strainer to the box.
Don’t rush it. You are not in a hurry. It is better to take this slowly, as you don’t want to spill any out. Not only that, the oil can clog your drain, if you spill it, but you are losing some of that oil that you want to reuse.
What you are looking for now is getting all nasty bits out of your oil. As you pour, you will see the filtration layer getting darker and darker, filling up with charcoal-like pieces. Those are leftovers from your meal.
What you are getting out is the clean oil that you can reuse in the future.
In the end, you should have an empty deep-fryer, a filter full of things to dispose of, and a container full of reusable oil.
Step #6 Make sure the oil is clean
Repeat Step #5 multiple times.
Now you have the luxury that you are transferring the oil between two boxes and skipping the deep fryer. This should be much easier to handle.
You are looking for clear oil in the container under your homemade filter. So pour it from one to another as many times as you need. It might never be perfect, but you want to make sure that you got out the majority of the unwanted bits.
Step #7 Storing the filtered oil
Now, what to do with the container full of filtered oil? Well, seal it up and store it. In the beginning, you might have been asking why to get a sealable box. Its purpose is to keep the filtered oil from spoiling.
As you have used the oil for deep frying, it smells, most likely good, but not only for you, but also for a lot of bugs that can get in, if it is not sealed.
Where you store it is up to you, but it should be a place that has the same temperature throughout the whole day. I store it in a fridge to have it handy and to keep it from deteriorating.
Step #8 Label the box
Another good idea is to label the box in some way with critical information. I always put the current date, type of oil, and what it was used for on the container. That way, you won’t forget, and anyone else who sees it will immediately know what the deal is.
If kept in a dark and cold environment, the filtered oil can be stored for up to 3 months, according to USDA. I am storing reused oil for up to six weeks in our fridge, just to stay on the safe side. That’s some money and nature saver right there!
Step #9 Reusing the oil
Now the deep fry oil that you want to reuse should be used with the same or at least similar foods. That’s why you have marked the box with the information. This labeling effort will keep your deep-fried fish from having a light taste of chicken.
So if you are deep frying potatoes, you can use the oil for a chicken next time. I would not use it for salad dressing, for example, as the transferred taste of potatoes might not be the thing you are looking for in your Ceasar salad.
In terms of repeated oil reuse, I do recommend not to aim extremely high. Three to four-times is fine, but more than that can be dangerous. With every cycle, you are introducing more leftovers and unwanted bits, and even with the filtration, the color will start to change.
To be sure, pour a bit into a glass and to another one pour fresh oil. This way, it is way easier to see the difference and not count on only your best guess. Anything that looks too dark, cloudy, gummy, or smells weird or off you should throw away.
Getting rid off the reused oil
In terms of disposing of the reused oil or oil in general, your first instinct might be to pour it into the sink or toilet and be done with it, right?
Well, that is not the best way to approach this issue. The oil can clog your drain and pipes and bring you a bigger problem than you would have, though.
The better way is to pour cold oil into a plastic bag, sealable container, or metal box, like a coffee, can or something similar, and then throw it into a trash can.
This way, you are disposing of your unwanted oil in a safe and nature-saving way.
Alternative
But what if you don’t want to fiddle around with containers, metal strainers, and cheesecloths to filter out your oil. But you still want to enjoy deep-fried food and save some money on the oil?
I say get the deep-fryer with an oil filtration system. As I have mentioned in the article about the worth of a deep fryer.
It will save you quite a bit of time, does the job, and as a bonus, you can always blame someone else.
Even if you use a deep fryer with oil filtration, you should still correctly label your containers with all vital information.
Final words
So I do hope I have been able to answer your question:
Can deep fry oil be reused?
If you keep my tips in mind, I believe that you will be doing great with your oil reusing and future deep-frying efforts.
Until next time I wish you happy and deep-fried cooking.


ThermoPro TP19H Digital Meat Thermometer for Cooking with Ambidextrous Backlit and Motion Sensing Kitchen Cooking Food Thermometer for BBQ Grill Smoker Oil Fry Candy Instant Read Thermometer


Fullstar Vegetable Chopper – Food Chopper – Onion Chopper – Vegetable Slicer & Spiralizer – Veggie Chopper with Container – Kitchen Gadgets – Home Essentials – Kitchen Accessories (4 in 1, White)


2 responses to “Can Deep Fry Oil be Reused?”
[…] oil is a popular oil for cooking, but can it be used for deep frying? The answer is yes! Canola oil is a great choice for deep frying because it has a high smoke point […]
[…] waste and environmental impact. In this article, I will share with you the best practices for filtering deep fryer oil, including preparation, techniques, and safety […]